Micros, minis, freestyles, individuals, boxes, trees, crochets, Goddesses – there are so many gorgeous ways to wear braids, it’s easy to lose count. And while not all kinds of braids demand the same kind of extension hair, they all require a quick, steady hand and securely attached hair extensions. So for any woman who has ever considered doing her own braids with human hair extensions – or has thought about learning how to braid hair for others – here’s how it’s done.
Step 1: Buy the right hair.
Know what kind of braided hairstyle you want, and make sure you buy virgin Indian Remy bulk hair that will help you achieve the right look. Be aware that slightly coarser or curlier hair will “grip” better, be easier to handle, and hold the style longer.
Step 2: Prep Both Sets of Hair – Extensions and Natural
Wash and deep condition your natural locks before braiding. The deep-conditioning step cannot be stressed enough, especially with smaller braids, because your hair will be plaited away for several weeks and miss those regular conditioning cycles. So don’t skimp on the deep conditioner!
Also give your human hair extensions a good wash or rinse beforehand. Follow package directions for shampooing and conditioning, and gently pull the strands apart and into one-inch-thick bundles as the hair dries. This will help the extensions dry faster, and will also make it easier for you to grab the right amount of extension hair later.
You can air or blow dry your hair, but just make sure to use a heat-protecting serum or product beforehand if blow drying. Remember, the goal is to make your hair as healthy as possible heading into the braiding process, so the strands can withstand the stress and pulling and grow while you rock your braid look.
Step 3: Part Dry Hair into Sections
Create three to four large sections by parting hair from ear to ear and then from forehead to crown or forehead to nape. Secure these sections with covered elastic bands or large clips.
Now, starting at the nape of the neck (this prevents tangling and confusion), divide your locks into even smaller sections, roughly ¼ to 1 inch wide. Each of these sections will be a braid, so make them smaller for micro braids and larger for bigger ones.
Step 4: Attach the Hair Extensions and Braid
Working one braid at a time, pinch off enough extension hair to match the size of the section of natural hair you’ll be braiding. Don’t grab too much - this will make your braids bulky and uneven – but also don’t get too little hair, as this will lead to spindly, lumpy braids.
Fold the extension hair near the top like a candy cane, so that you have about three inches hanging down on the short end. Hook the extensions over the top of the section of hair to be braided, making sure to hold the hair taut and close to the scalp.
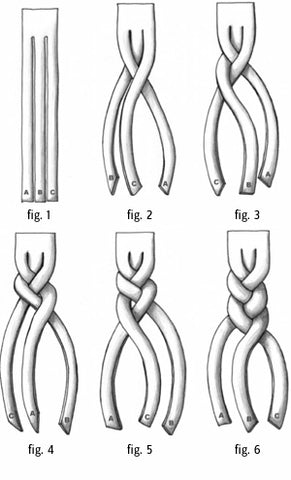
Now you should have three sections of hair lined up near each other: the shorter end of the hair extensions on the left, your natural hair in the middle, and the long end of the extensions on the right. Pulling tightly, but not so tightly that it causes pain, bring your natural hair to the left and the shorter extension piece to the middle. Then pull the longer extensions to the middle and the shorter piece to the right.
Continue criss-crossing these three sections of hair until all your natural hair has been interwoven, then continue a few more strokes until the extension hair is secure and tight. For micro and tree braids, you may use a slipknot to secure the braid and let the ends fall loose, although this is not necessary. For most other kinds of styles, keep braiding until you reach the end of the hair extensions.
After that, you can trim, curl, and style your braids any way you like. Enjoy!
 Have Questions? Call Us!


